A Smaller School?
Deliver a polished, branded event experience without a large team or a big budget.
A Smaller School?
Deliver a polished, branded event experience without a large team or a big budget.
Running Family Programs?
Give families everything they need, from schedules and maps to real-time updates, all in one place.
Running Family Programs?
Give families everything they need, from schedules and maps to real-time updates, all in one place.
Coordinating Move-In Day?
Share updates, manage events, and keep students informed from move-in through the academic year.

Coordinating Move-In Day?
Share updates, manage events, and keep students informed from move-in through the academic year.
Offering Campus Tours?
Deliver branded, self-guided tour experiences with interactive maps and rich media, available 24/7.

Offering Campus Tours?
Deliver branded, self-guided tour experiences with interactive maps and rich media, available 24/7.
Organising a Career Fair?
Simplify logistics for students, employers, and Career Services staff with one easy-to-use app.
Organising a Career Fair?
Simplify logistics for students, employers, and Career Services staff with one easy-to-use app.
Managing Alumni Events?
Plan reunions, regional events, and fundraising campaigns with an app built for alumni engagement.
Managing Alumni Events?
Plan reunions, regional events, and fundraising campaigns with an app built for alumni engagement.
Boost Student Engagement
One hub for schedules, resources, and events that keeps students connected throughout the academic year.
Boost Student Engagement
One hub for schedules, resources, and events that keeps students connected throughout the academic year.
Planning Orientation?
Help new students feel prepared from day one with schedules, campus resources, and real-time updates in one app.
Planning Orientation?
Help new students feel prepared from day one with schedules, campus resources, and real-time updates in one app.
Running Admissions Events?
Manage open houses, tours, and yield events with a branded app that saves time and engages prospective students.

Running Admissions Events?
Manage open houses, tours, and yield events with a branded app that saves time and engages prospective students.
Get a custom Sponsorship Package Template
Stop starting from scratch. Grab free templates that helWe'll build a tailored sponsorship package with suggested pricing, tiers, and benefits..for your specific event.p you build professional sponsorship packages and close deals faster.
Get a custom Sponsorship Package Template
Stop starting from scratch. Grab free templates that helWe'll build a tailored sponsorship package with suggested pricing, tiers, and benefits..for your specific event.p you build professional sponsorship packages and close deals faster.
Plan Your Next Event Without Missing a Beat.
From venue selection to post-event wrap-up, this free checklist walks you through every step (so nothing falls through the cracks).
.avif)
Plan Your Next Event Without Missing a Beat.
From venue selection to post-event wrap-up, this free checklist walks you through every step (so nothing falls through the cracks).
Real Results From Real Events
100,000+ organizations trust Guidebook. See exactly how universities, associations, enterprises, and more put it to work.

Real Results From Real Events
100,000+ organizations trust Guidebook. See exactly how universities, associations, enterprises, and more put it to work.
Flexible pricing for every event size
Find the perfect plan for your needs, from intimate gatherings to large-scale conferences.

Flexible pricing for every event size
Find the perfect plan for your needs, from intimate gatherings to large-scale conferences.
Join our event experts
Watch on-demand webinars and join live sessions with industry leaders sharing best practices for event success.
.avif)
Join our event experts
Watch on-demand webinars and join live sessions with industry leaders sharing best practices for event success.
Guidebook in Action
Book a personalized walkthrough and discover how we help event teams create better attendee experiences.
Guidebook in Action
Book a personalized walkthrough and discover how we help event teams create better attendee experiences.
Guidebook Tips: Organizing a Complex Schedule


Guidebook Tips: Organizing a Complex Schedule
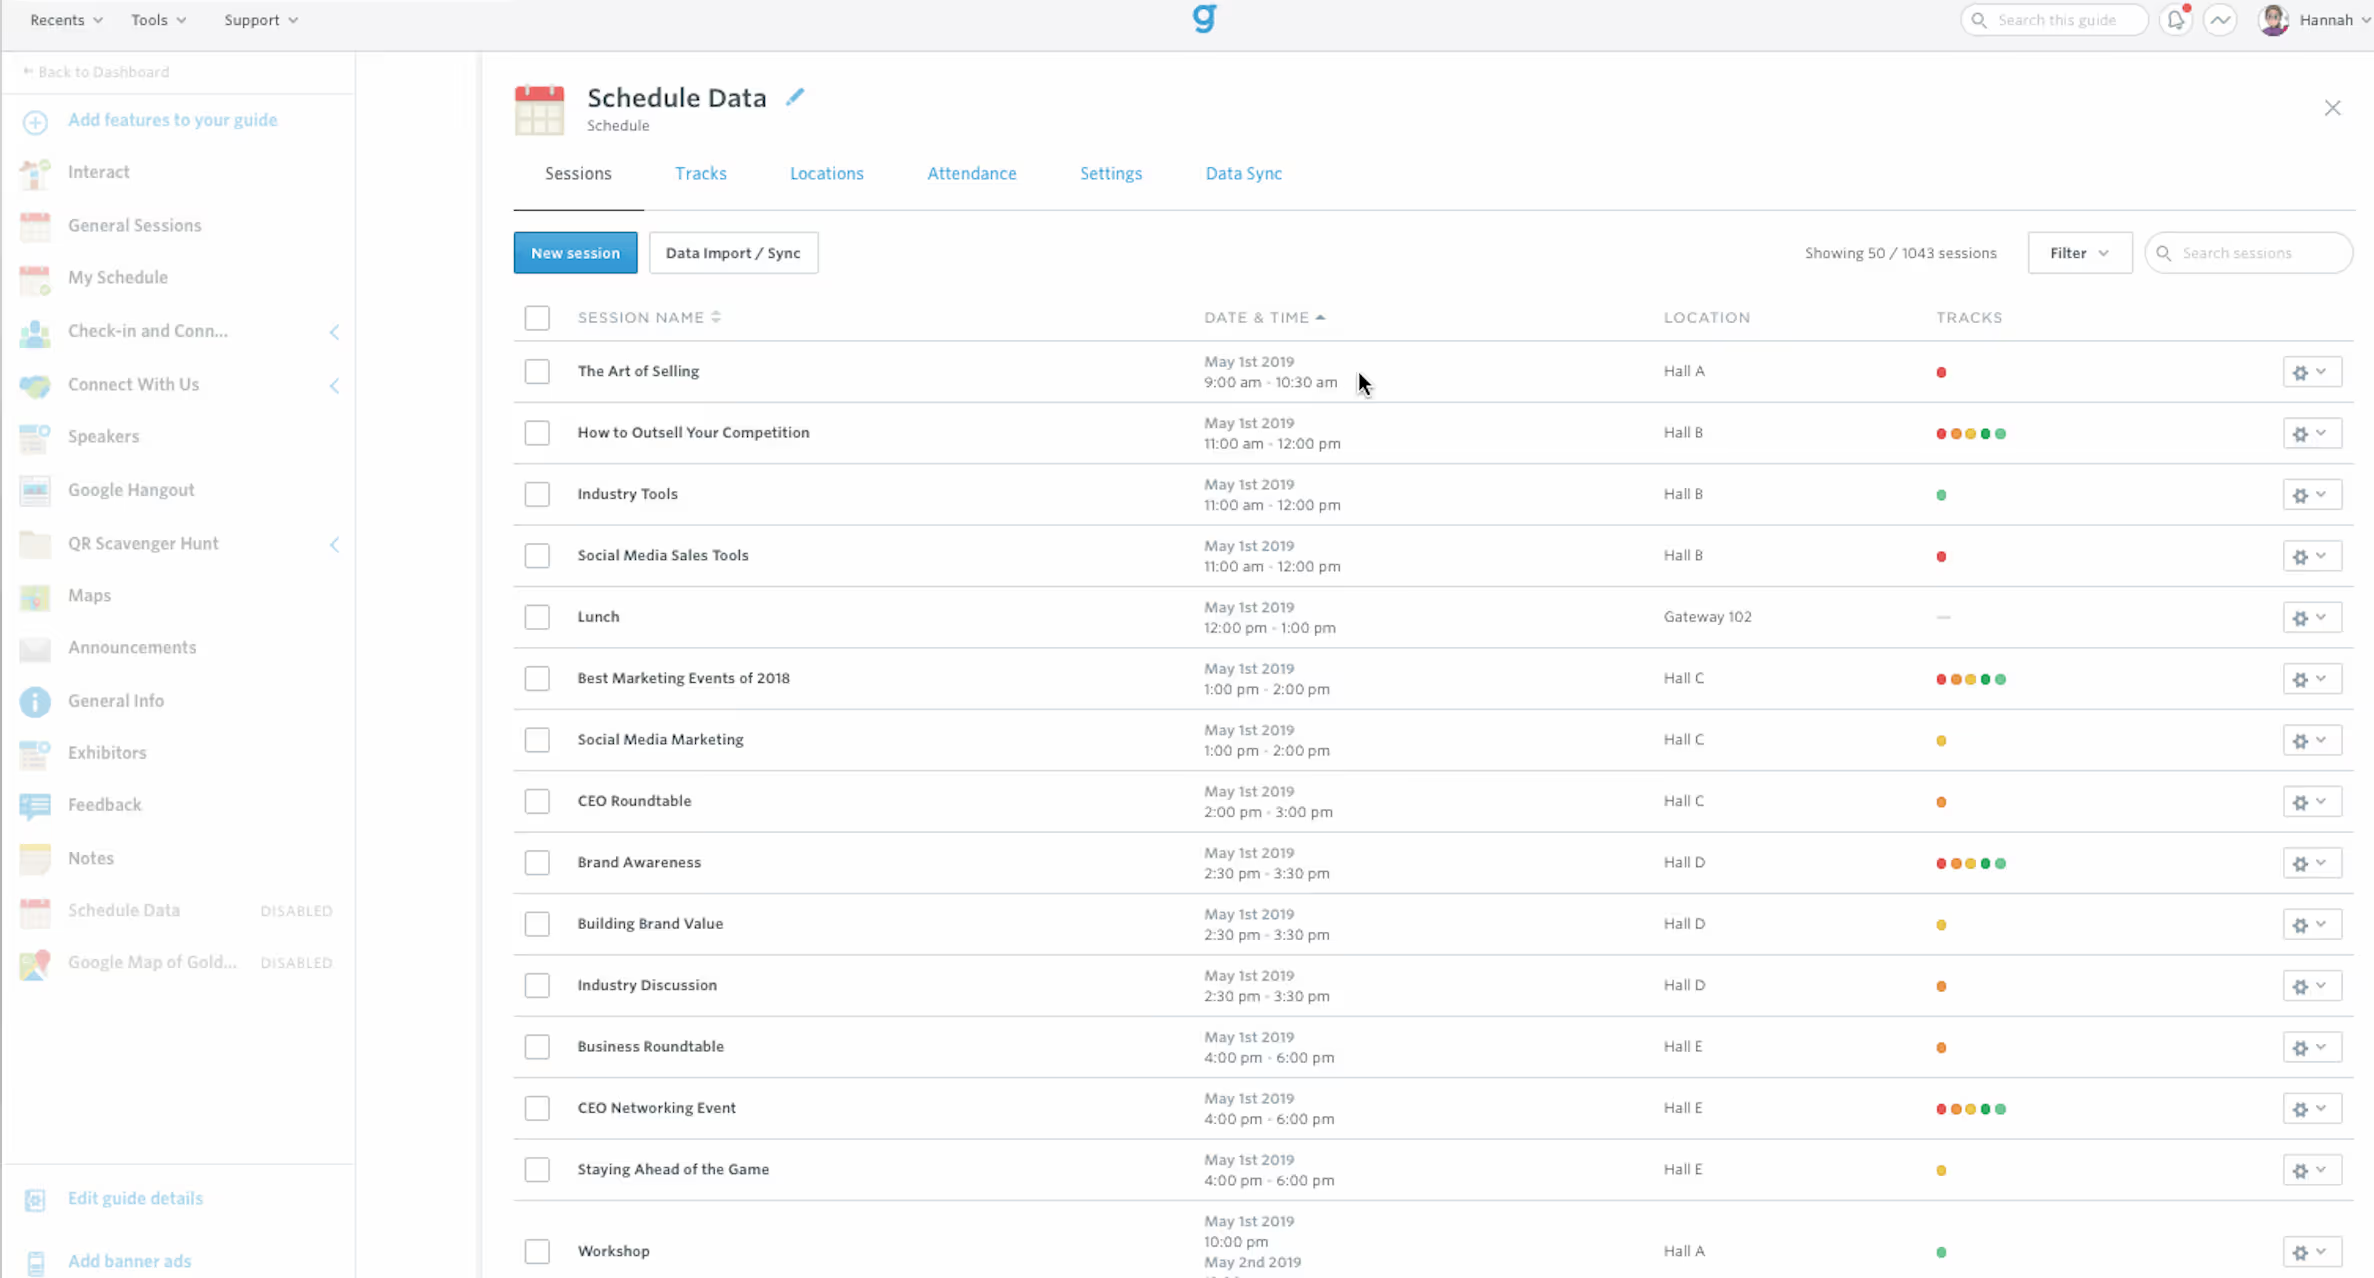
Schedule Tracks
When you begin to collect your schedule data, it is likely already split up by topics, dates, groups, or other sub-sections. This natural segmentation creates great opportunities to use schedule tracks! If your data isn’t split up into sections yet, your team can think through what segmentation may be most helpful for your attendees. Already added your data to Builder? You can always add schedule tracks after your data is already imported (either manually within Builder, or using a template export). To keep your schedule tracks easily accessible, we also typically recommend pinning your schedule tracks to your guide’s menu and putting them in a folder. The folder might be called “Schedule Tracks,” “Topics,” or whatever makes sense for your event! To access our support resources about how to use schedule tracks and pinning tracks, click here. Pinning tracks allows your users to have an easier experience when navigating the menu and schedule.
Sub-Sessions
Creating sub-sessions in your schedule is a bit more complex, but the end result is worth the effort! Take a look at the example below. There is only one ‘Breakout Sessions’ listing in the general schedule (on the left). Once users click into that listing, they’re able to view all of the relevant sub-sessions. With this setup, those sub-sessions aren’t taking up real estate on the main schedule view.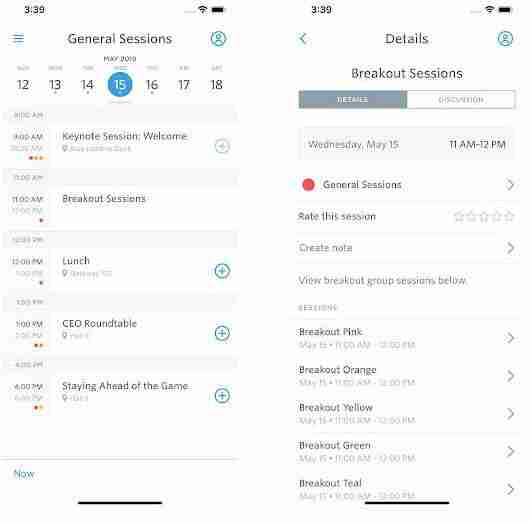
Use-cases for sub-sessions:
- Breakout sessions
- A session block with staggered presenters
- Same session, but varying locations
- Same timeframe, but each group is doing something different
- Numerous concurrent sessions
Steps to Create Sub-sessions
- Build your schedule either manually or with a template. Your schedule should include the sub-sessions. To use the above example, there will be sessions called “Breakout Sessions” from 1-2pm, and then all ten breakout sessions - “Breakout Blue” from 1-2pm, “Breakout Red” from 1-2pm, etc.
- Create a schedule track and pin the track. This will serve as your “main schedule.” You can call it “Main Schedule,” “Schedule-at-a-Glance,” or a name that makes sense for your use case. This will house the sessions that you want to be easily accessible. In the example above, Breakout Sessions would be assigned to this schedule track. You can include this information in a template if you are using one. We won’t assign our sub-sessions to a track (we’ll explain why below).
- Disable the schedule feature. You can only have one schedule feature in your guide, and it hosts all of your schedule data (from all of your tracks). Since we’re picking and pinning our schedule tracks to the menu, we’ll hide the full schedule feature from view (as it’s not the most optimal way to display our sessions). I often re-name the disabled feature to “Schedule Data” so I do not get confused between my pinned tracks and the full schedule data. We disable, or hide, the master schedule so that users only see the “Schedule-at-a-Glance” schedule and not all the sub-sessions.
- Export your schedule data and grab a linking template from the schedule data menu item.
- Link the master session (Breakout Sessions) to the sub-sessions (Breakout Blue, Breakout Red, etc.) and import your linking template.
 At the end of the day, though it does take some work, using sub-sessions is a great way to organize a complex schedule! If you have any questions about organizing your schedule, we’re always here to help at support@guidebook.com; please don’t hesitate to reach out!
  Hannah is a Customer Success Associate in the Raleigh office. She helps clients build great guides and is a member of the support team at Guidebook! Hannah teaches yoga and meditation in the office and in her free time.
Plan with Confidence, Not stress
Get the complete event planning checklist with pre-event prep, day-of setup, and post-event follow-up all in one place..


.avif)